# 命令模式
# 1、基本概念
命令模式是一种行为型设计模式,其目的是将一个请求或操作封装成一个独立的对象,以便于在不同的上下文环境中使用、传递和操作。
该模式实现了请求的发送者和接收者之间的松耦合,使你可用不同的请求对客户进行参数化;
命令模式的优点是支持请求排队或记录日志,以及可撤销的操作。
正因为命令模式的这些特征,虽使得它的使用场景有限,但是使用场景特别明确(你不会有误用某个设计模式而增加系统的设计成本的心智负担)
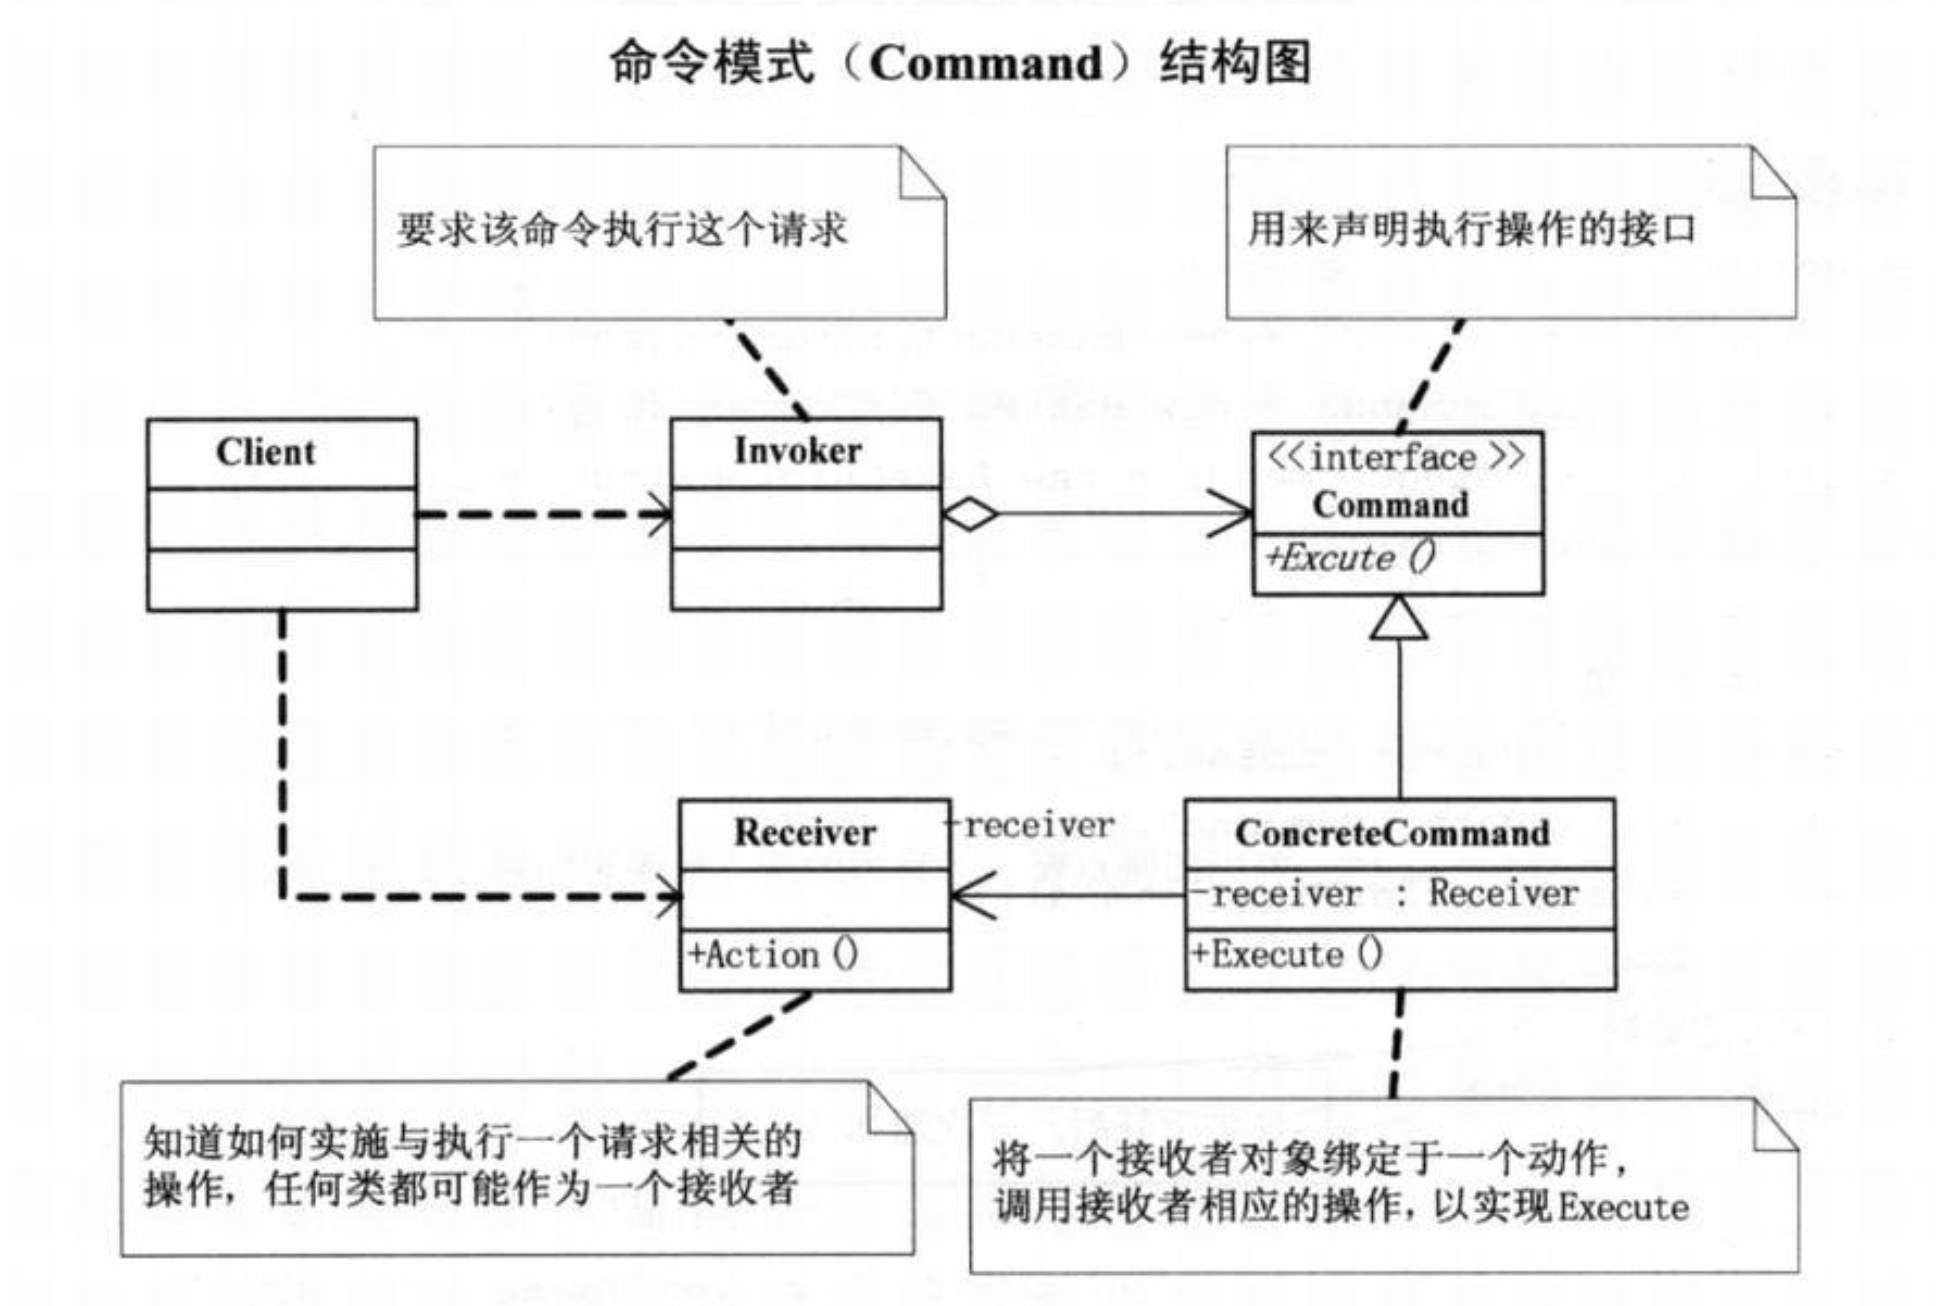
命令模式的UML图如下:

上述这个UML图一眼看起来可能会让人摸不着头脑,逐一对其进行分析发现其实也不难理解。首先,Client类的依赖关系可以不用看,因为它不是命令模式的核心。
Command是一个接口,定义命令的规格,业务命令类根据其负责的业务逻辑实现Command接口,它的内部需要持有一个Receiver类的实例(关联关系),其目的是为了Command的实现类在执行特定操作的时候,能够将消息报告给外界(如果你不需要这样的操作,这一步也可以省略);
关键的设计在于Invoker类,它内部管理着一批命令(因此UML图中用的是聚合关系),而我们的撤销,日志记录,请求排队等操作全部都在于这个类中进行控制的(一般用队列实现,如果有复杂优先级的处理,还可以使用堆进行管理)。
# 2、代码示例
/**
 * 消息通知类
 */
class Receiver {
  notify() {
    console.log("通知消息已传达~~");
  }
}

/**
 * 命令接口
 */
interface Command {
  action: Action;

  exec(): void;
}

/**
 * 业务命令接口
 */
class CopyCommand implements Command {
  constructor(public action: Action) {}

  // #region 非必须,可以根据业务需要决定
  receiver: Receiver;

  setReceiver(r: Receiver) {
    this.receiver = r;
  }
  // #endregion

  exec(): void {
    // 非必须,可以根据业务决定
    this.receiver.notify();
    this.action.work();
  }
}

/**
 * 命令调用者,命令模式核心类
 */
class Invoker {
  protected cmd: Command;

  setCommand(cmd: Command) {
    this.cmd = cmd;
  }

  execCommand() {
    this.cmd.exec();
  }
}

class Action {
  work() {
    console.log("干活儿");
  }
}

const copyAction = new Action();
const copyCmd = new CopyCommand(copyAction);
const invoker = new Invoker();
invoker.setCommand(copyCmd);
invoker.execCommand();
上述代码中,CopyCommand的行为是外部注入(依赖倒置原则的体现)的,如果在实际业务中,你的业务场景如果足够简单的话,也可以直接将行为内聚到业务命令接口内,可以根据实际情况灵活调整。
# 3、在前端中的实践
命令模式是我学习设计模式中少有的一开始学习前端就掌握的设计模式,所以我在实际开发中应用了很多次了。
我所负责的业务需求,只要遇到编辑器这类业务场景(几乎都会有撤销,重做等需求),我都会使用命令模式进行实现。我就以Antv/X6的@antv/x6-plugin-history插件的源码给大家举个例子。

import { KeyValue, Basecoat, Model, Graph } from "@antv/x6";
import "./api";

export class History
  extends Basecoat<History.EventArgs>
  implements Graph.Plugin
{
  public name = "history";
  protected redoStack: History.Commands[];
  protected undoStack: History.Commands[];
  protected batchCommands: History.Command[] | null = null;
  protected stackSize = 0; // 0: not limit

  protected readonly handlers: (<T extends History.ModelEvents>(
    event: T,
    args: Model.EventArgs[T]
  ) => any)[] = [];

  constructor(options: History.Options = {}) {
    super();
    const { stackSize = 0 } = options;
    this.stackSize = stackSize;
  }

  undo(options: KeyValue = {}) {
    if (!this.disabled) {
      const cmd = this.undoStack.pop();
      if (cmd) {
        this.revertCommand(cmd, options);
        this.redoStack.push(cmd);
        this.notify("undo", cmd, options);
      }
    }
    return this;
  }

  redo(options: KeyValue = {}) {
    if (!this.disabled) {
      const cmd = this.redoStack.pop();
      if (cmd) {
        this.applyCommand(cmd, options);
        this.undoStackPush(cmd);
        this.notify("redo", cmd, options);
      }
    }
    return this;
  }

  clean(options: KeyValue = {}) {
    this.undoStack = [];
    this.redoStack = [];
    this.notify("clean", null, options);
    return this;
  }
  // #endregion

  protected createCommand(options?: { batch: boolean }): History.Command {
    return {
      batch: options ? options.batch : false,
      data: {} as History.CreationData,
    };
  }

  protected revertCommand(cmd: History.Commands, options?: KeyValue) {}

  protected applyCommand(cmd: History.Commands, options?: KeyValue) {}

  protected executeCommand(
    cmd: History.Command,
    revert: boolean,
    options: KeyValue
  ) {}

  protected addCommand<T extends keyof Model.EventArgs>(
    event: T,
    args: Model.EventArgs[T]
  ) {}

  protected notify(
    event: keyof History.EventArgs,
    cmd: History.Commands | null,
    options: KeyValue
  ) {}

  protected push(cmd: History.Command, options: KeyValue) {}

  protected undoStackPush(cmd: History.Commands) {}
}

export namespace History {
  export interface Command {
    batch: boolean;
    modelChange?: boolean;
    event?: ModelEvents;
    data: CreationData | ChangingData;
    options?: KeyValue;
  }
  export type Commands = History.Command[] | History.Command;
}
以上代码经过了节选,如果你想阅读源码,可以查看此处 (opens new window)
另外一个例子是最近在Promise的处理中遇到的一点儿启发。
先给大家描述一下需求:
我需要做一个音乐审核后台,这个后台的用户需要判断音乐是否有噪音,每个人一天至少要审核几十首歌,一个音乐有20多MB(因为是wav格式,没有压缩),如果想让用户在用的时候再下载的话,加载音乐预计花费 1 分钟的样子,使用起来极其难受;
用户提出能不能先将其缓存(比如我现在需要去喝杯咖啡,我可以先将一系列的资源缓存下来,一会儿回来之后,我再处理,将会是秒开,工作生活两不误),为了让用户实现一键缓存的效果(如果让用户一个一个的点,那得把开发骂死😂),此时不管他有多少待审核的,肯定是要全部缓存完的,这种场景肯定是要控制并发量的,否则用起来相当的卡顿,因此会引入队列的设计;
但是还有个问题,我页面上可能还有其它异步请求,缓存音乐对于我来说是一个优先级不是那么高的操作,对于其它异步请求,可以将其包裹成异步任务放在任务队列的前面去处理;
接着又有一个新问题,如果这个异步任务还没有执行,但是我此时想要撤销(比如一进来加载用户的已审核数据,虽然用户不是马上就要看,用户审核之后,需要重新拉取已审核的数据),避免重复执行。
开始时,我做了力扣的这道题,design-cancellable-function (opens new window),于是我就在想能不能让异步函数也能取消?但是异步函数跟Generator函数约定每步返回一个Promise这种场景有个很大的区别,异步函数是自执行操作,如果想取消,只能取消整个函数,并且如果假设中间一旦有多个串行的异步任务,一旦开始也就再也控制不了了。
所以,对于异步函数本身的改造无法做到,那就只能借助设计模式,思考一下前面提到的关键词:并发控制,队列,优先级,可撤销,毫无疑问,这个场景就是命令模式的绝佳用武之地。
以下是上述需求的实现,篇幅有限,没有将业务代码给大家展示。
首先是对于一个可取消任务的设计,这个部分,就相当于是命令模式中的命令节点,但我并没有将其命名为XxxCommand
// 取消原因哨兵对象,使得调用方可以明确知道是取消而非错误信息
const CancelledReason = Symbol("Async task has been cancelled");
/**
 * 可取消的任务
 */
interface CancellableTask<T> {
  /**
   * 异步操作执行函数
   * @param args
   * @returns
   */
  action: (...args: any[]) => Promise<T>;
  /**
   * 取消任务
   * @returns
   */
  cancel: () => void;
}

/**
 * 将一个普通任务包裹成一个可取消的任务
 * @param fn 普通任务
 * @param args 普通任务的预设参数
 * @returns
 */
function createCancellableTask<T>(
  fn: (...args: any[]) => T | Promise<T>,
  ...args: any[]
): CancellableTask<T> {
  let trigger: ((reason?: any) => void) | null = null;
  let isCancel = false;
  const action = () => {
    // 如果在action方法调用之前就已经调用,那么此刻直接返回一个取消的Promise
    if (isCancel) {
      return Promise.reject(CancelledReason);
    }
    // 部署真正的异步任务,若在异步任务未完成之前取消,则返回取消的原因,否则取最终的结果作为Promise的结果
    return new Promise<T>((resolve, reject) => {
      trigger = reject;
      Promise.resolve(fn(...args))
        .then(resolve)
        .catch(reject);
    });
  };
  const cancel: () => void = () => {
    isCancel = true;
    typeof trigger === "function" && trigger(CancelledReason);
  };
  return {
    action,
    cancel,
  };
}
上述代码中,为什么createCancellableTask函数要设计成这个样子,其实借鉴了JS的call和apply函数的设计,事先将函数的参数预设,因为后面调用者再考虑参数,处理起来就难受,并且还会和任务调度器的处理逻辑耦合,得不偿失,这样的设计可以极大简化任务调度器的负担。
接着是任务调度器,可以将其视为命令模式示例UML中的Invoker类,这个代码改造自此处
interface AsyncTaskNode<T> {
  // 保存返回的Promise的resolve触发器
  resolve: (value: T) => void;
  // 保存返回的Promise的reject触发器
  reject: (reason: any) => void;
  // 任务真实节点
  cancellableTask: CancellableTask<T>;
}

type InsertAction = "push" | "unshift";

class AsyncTaskScheduler<T> {
  /**
   * 定义当前正在执行的异步任务
   */
  private runningTask = 0;
  /**
   * 定义任务调度器允许的最大异步并发量
   */
  private maxTask = 5;
  /**
   * 异步任务队列,用于记录暂时无法处理稍候需要处理的内容
   */
  private asyncTaskQueue: AsyncTaskNode<T>[] = [];
  /**
   * 定义方法,供外界任务内容加入到当前的调度器中执行
   */
  add(cancellableTask: CancellableTask<T>, ac: InsertAction = "push") {
    return new Promise((resolve, reject) => {
      if (this.runningTask < this.maxTask) {
        this.runningTask++;
        const { action } = cancellableTask;
        action()
          .then((response) => {
            this.runningTask--;
            resolve(response);
            this.run();
          })
          .catch((err) => {
            this.runningTask--;
            reject(err);
            this.run();
          });
      } else {
        this.asyncTaskQueue[ac]({
          resolve,
          reject,
          cancellableTask,
        });
      }
    });
  }

  /**
   * 优先插入的任务
   * @param cancellableTask
   */
  addFirst(cancellableTask: CancellableTask<T>) {
    this.add(cancellableTask, "unshift");
  }

  private run() {
    while (this.asyncTaskQueue.length && this.runningTask < this.maxTask) {
      const task = this.asyncTaskQueue.shift();
      const { cancellableTask, reject, resolve } = task!;
      const { action } = cancellableTask;
      this.runningTask++;
      action()
        .then((response) => {
          this.runningTask--;
          resolve(response);
          this.run();
        })
        .catch((err) => {
          this.runningTask--;
          reject(err);
          this.run();
        });
    }
  }
}
最后是上述代码的单元测试用例:
function printMsg(msg: string) {
  return new Promise<string>((resolve) => {
    setTimeout(() => {
      resolve(msg);
    }, 3000);
  });
}

function errorMsg(msg: string) {
  return new Promise<string>((resolve, reject) => {
    setTimeout(() => {
      reject(msg);
    }, 3000);
  });
}

describe("error", () => {
  let task: CancellableTask<string>;
  let scheduler: AsyncTaskScheduler<string>;

  beforeEach(() => {
    task = createCancellableTask<string>(errorMsg, "hello world");
    scheduler = new AsyncTaskScheduler<string>();
  });

  it("test command 1", (done) => {
    const p = scheduler.add(task);

    p.then((resp) => {
      console.log(resp);
    }).catch((reason) => {
      done();
      expect(reason).toBe(CancelledReason);
    });

    setTimeout(() => {
      task.cancel();
    }, 300);
  });

  it("test command 2", (done) => {
    const now = Date.now();
    const p = scheduler.add(task);

    p.catch((err) => {
      console.log(Date.now() - now);
      done();
      expect(err).toBe("hello world");
    });
  });
});

describe("success", () => {
  let task: CancellableTask<string>;
  let scheduler: AsyncTaskScheduler<string>;

  beforeEach(() => {
    task = createCancellableTask<string>(printMsg, "hello world");
    scheduler = new AsyncTaskScheduler<string>();
  });

  it("test command 1", (done) => {
    const p = scheduler.add(task);

    p.then((resp) => {
      console.log(resp);
    }).catch((reason) => {
      done();
      expect(reason).toBe(CancelledReason);
    });

    setTimeout(() => {
      task.cancel();
    }, 300);
  });

  it("test command 2", (done) => {
    const now = Date.now();
    const p = scheduler.add(task);

    p.then((resp) => {
      console.log(Date.now() - now);
      done();
      expect(resp).toBe("hello world");
    });
  });

  it("test command 3", (done) => {
    const now = Date.now();
    const p = scheduler.add(task);

    p.catch((err) => {
      console.log(Date.now() - now);
      expect(err).toBe(CancelledReason);
      done();
    });

    task.cancel();
  });

  it("test command 4", (done) => {
    const now = Date.now();
    const p = scheduler.add(task);

    p.then((resp) => {
      console.log(Date.now() - now);
      expect(resp).toBe("hello world");
      done();
    });

    setTimeout(() => {
      task.cancel();
    }, 4000);
  });
});
最后,需要补充的一点是,上述的设计并没有侵入业务代码,业务代码仍然具有原子性,即一旦某个任务开始做了,比如网络请求已经发送出去了,那就真的发出去了,这个是无法取消的,取消操作真正取消的是外界不再处理这个操作的后续结果。