# 享元模式
# 1、基本概念
享元模式,是一种用于性能优化的设计模式,享元模式的英文叫fly-weight,其含义是蝇量级,主要用于减少创建对象的数量,以减少内存占用和提高性能。
享元模式的关键是划分内部和外部状态(变化和不变,不变的就是复用对象的内部状态,变化的内容则由外界传递进来,在某一刻得到执行(有点儿依赖注入:Dependencies Inject,简称DI的味道))来实现对象的复用的,另外,享元模式会有工厂模式的思想在其中,工厂实现对象的复用逻辑的控制。
我将其字面意思理解成”共享-元数据“(仅仅是我个人的理解,非官方解释,因为享元模式需要划分内部和外部的状态,内部的状态数据不就是复用对象的元数据嘛,而外部的数据是根据需求传递的,内部数据不就成了共享的嘛,哈哈哈)。
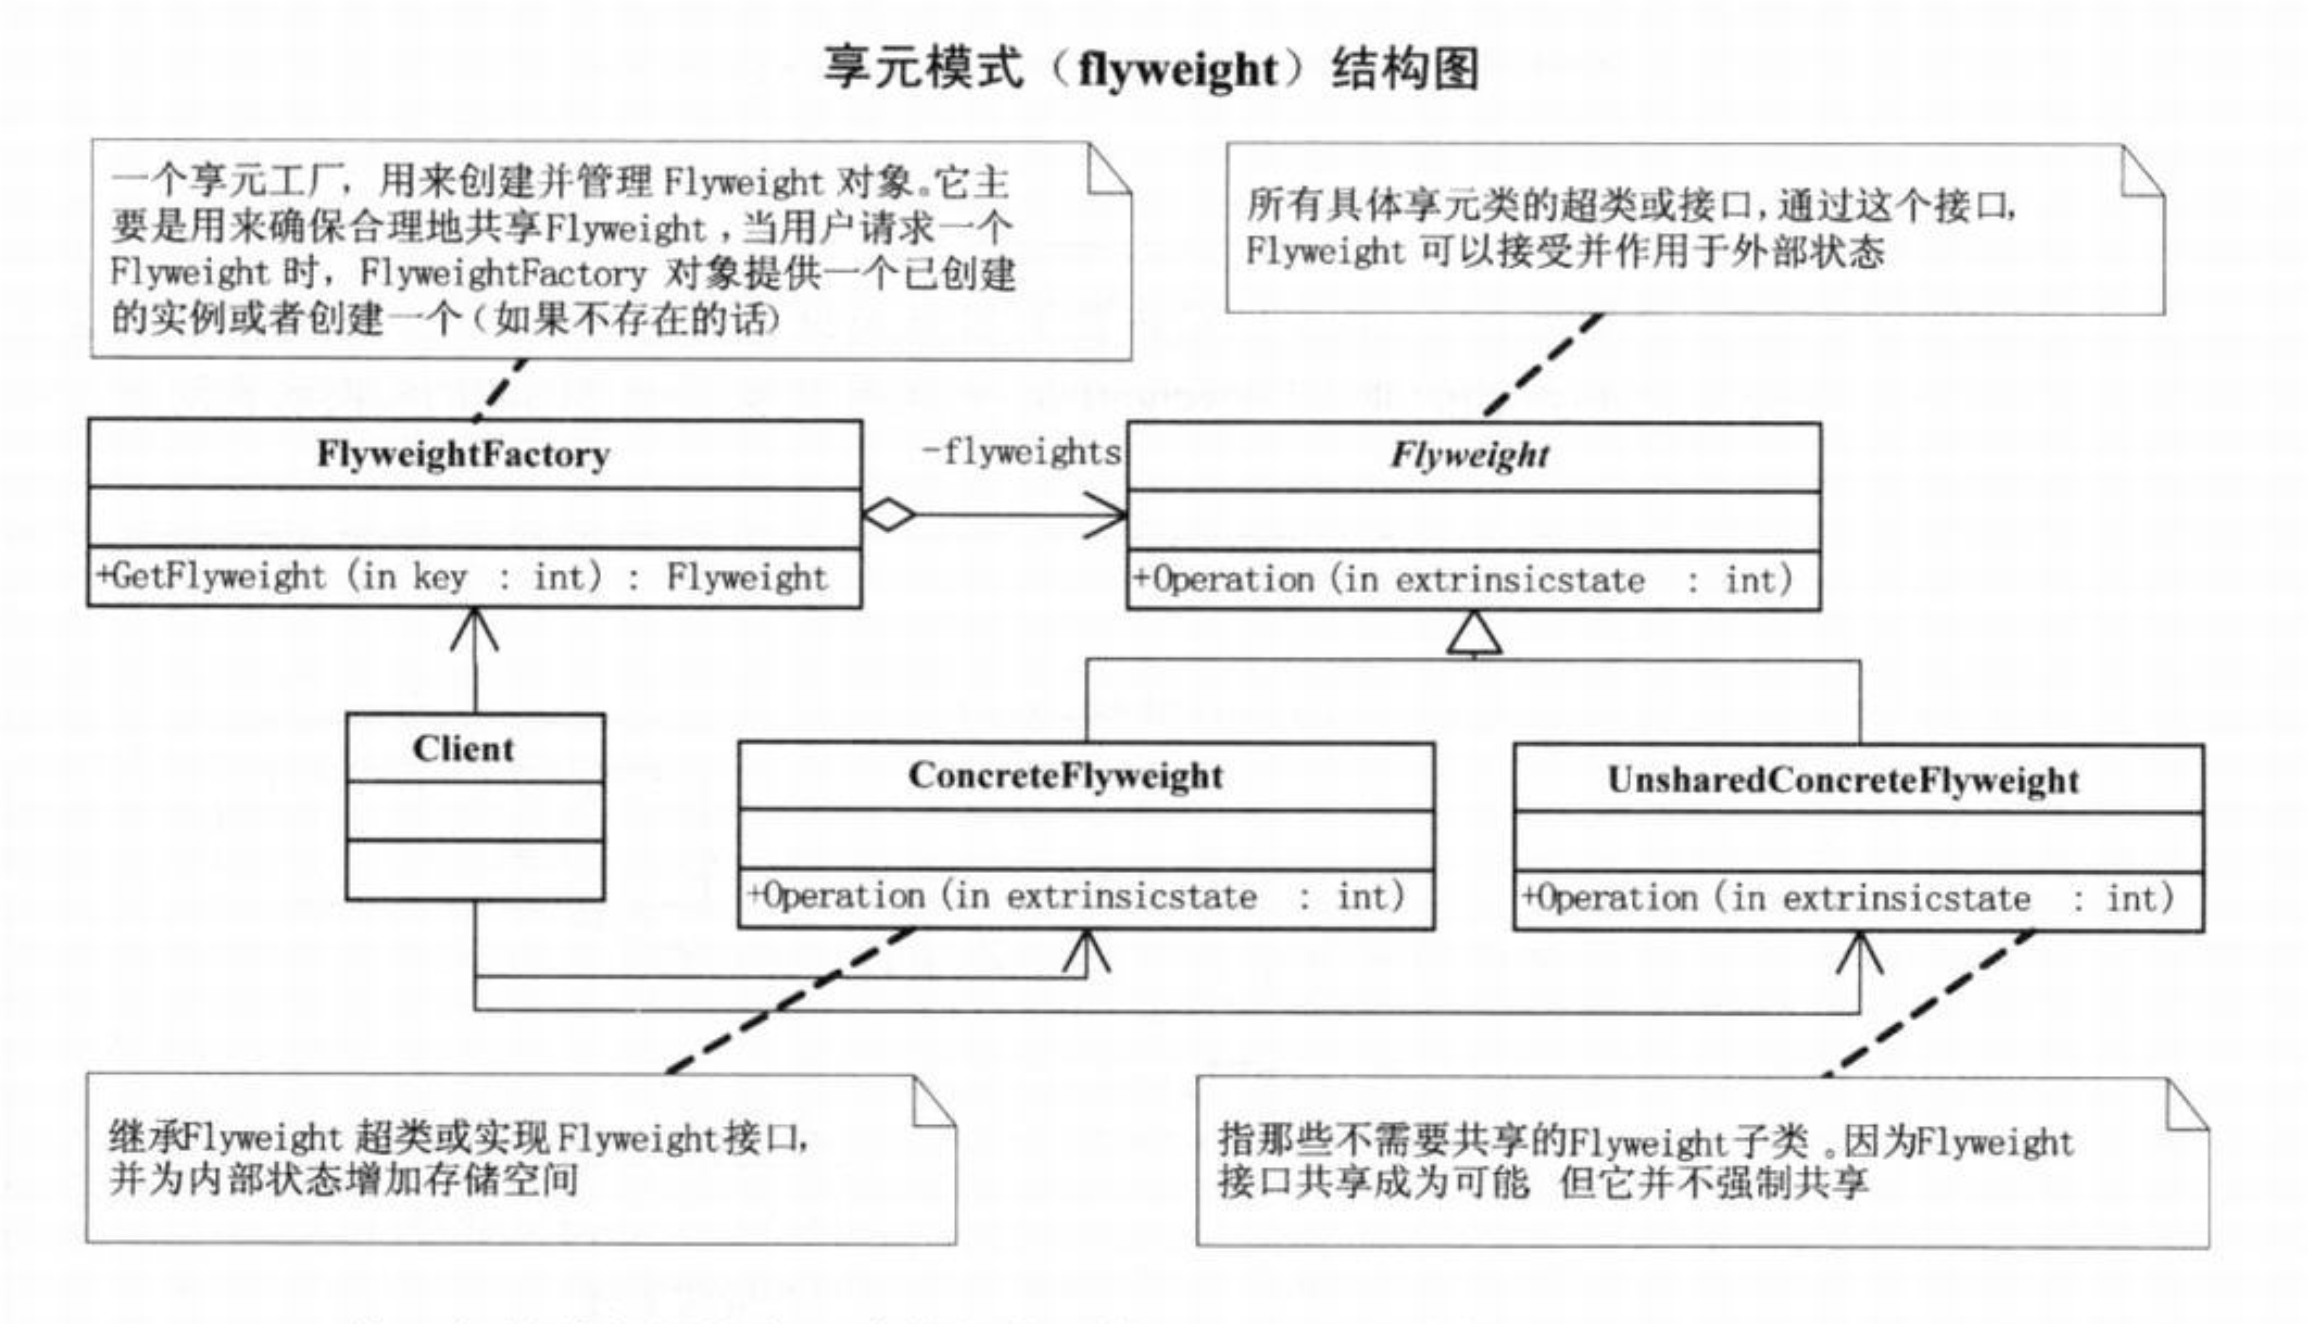
以下是享元模式的UML图:

上图的含义是,FlyWeight抽象了一个功能,通过ConcreteFlyWeight和UnsharedConcreteFlyWeight去实现它,同时定义了一个享元工厂,FlyWeightFactory,其对外暴露一个获取FlyWeight对象实例的方法,当我们需用用到ConcreteFlyWeight的实例时,从FlyWeightFactory取,如果去不到,则初始化,并将其存储起来,如果已经初始化,则直接复用。
# 2、代码示例
abstract class FlyWeight {
  abstract notify(msg: string): void;
}

class ConcreteFlyWeight extends FlyWeight {
  notify(msg: string): void {
    console.log("我是享元对象输出消息:" + msg);
  }
}

class UnsharedConcreteFlyWeight extends FlyWeight {
  notify(msg: string): void {
    console.log("我是非享元对象输出消息:" + msg);
  }
}

class FlyWeightFactory {
  private static map: Map<string, FlyWeight> = new Map();

  static {
    // 系统初始化一些干活儿的对象
    this.map.set("A", new ConcreteFlyWeight());
    this.map.set("B", new ConcreteFlyWeight());
  }

  static getFlyWeight(type: string): FlyWeight {
    // 如果对象不存在,则创建,如果存在,直接复用对象
    let flyWeightInstance = this.map.get(type);
    if (!flyWeightInstance) {
      flyWeightInstance = new ConcreteFlyWeight();
      this.map.set(type, flyWeightInstance);
    }
    return flyWeightInstance;
  }
}

function bootstrap() {
  const flyA = FlyWeightFactory.getFlyWeight("A");
  const flyB = FlyWeightFactory.getFlyWeight("B");
  const flyC = FlyWeightFactory.getFlyWeight("C");
  const flyD = FlyWeightFactory.getFlyWeight("A");
  const normalObj = new UnsharedConcreteFlyWeight();
  flyA.notify("你好,比尔盖茨~");
  flyB.notify("你好,库克~");
  flyC.notify("你好,乔布斯~");
  flyD.notify("你好,马云~");
  normalObj.notify("你好,雷军~");
}
# 3、前端开发中的实践
由于现代Web前端开发一般都会基于Vue,React等基于虚拟DOM的框架进行开发,再加上ESM语法的出现,享元模式的在实际的业务开发场景不常见。
像一些设计模式书上给出的例子,可能某些时候基于框架开发,就完全不会那样去写代码了,设计模式是为了降低我们代码的复杂度,增加软件的可维护性,所以不要为了设计模式而设计模式。
比如曾探先生所著的《JavaScript设计模式与开发实际》一书中,对于享元模式给的示例是一个文件上传的例子,但是如果基于Vue或者React框架编写代码,可能就直接让文件上传这个功能模块成为一个组件了(可以用虚拟滚动来处理上传文件的列表项过多;可以用一个任务管理器控制并发以防止一下并发过大,造成浏览器卡死,这个场景会限制并发,但也不是套用享元模式的代码范式)。
以下是一个我最近在一个实际开发中出现的例子,这个场景就是一个十分恰当的例子。
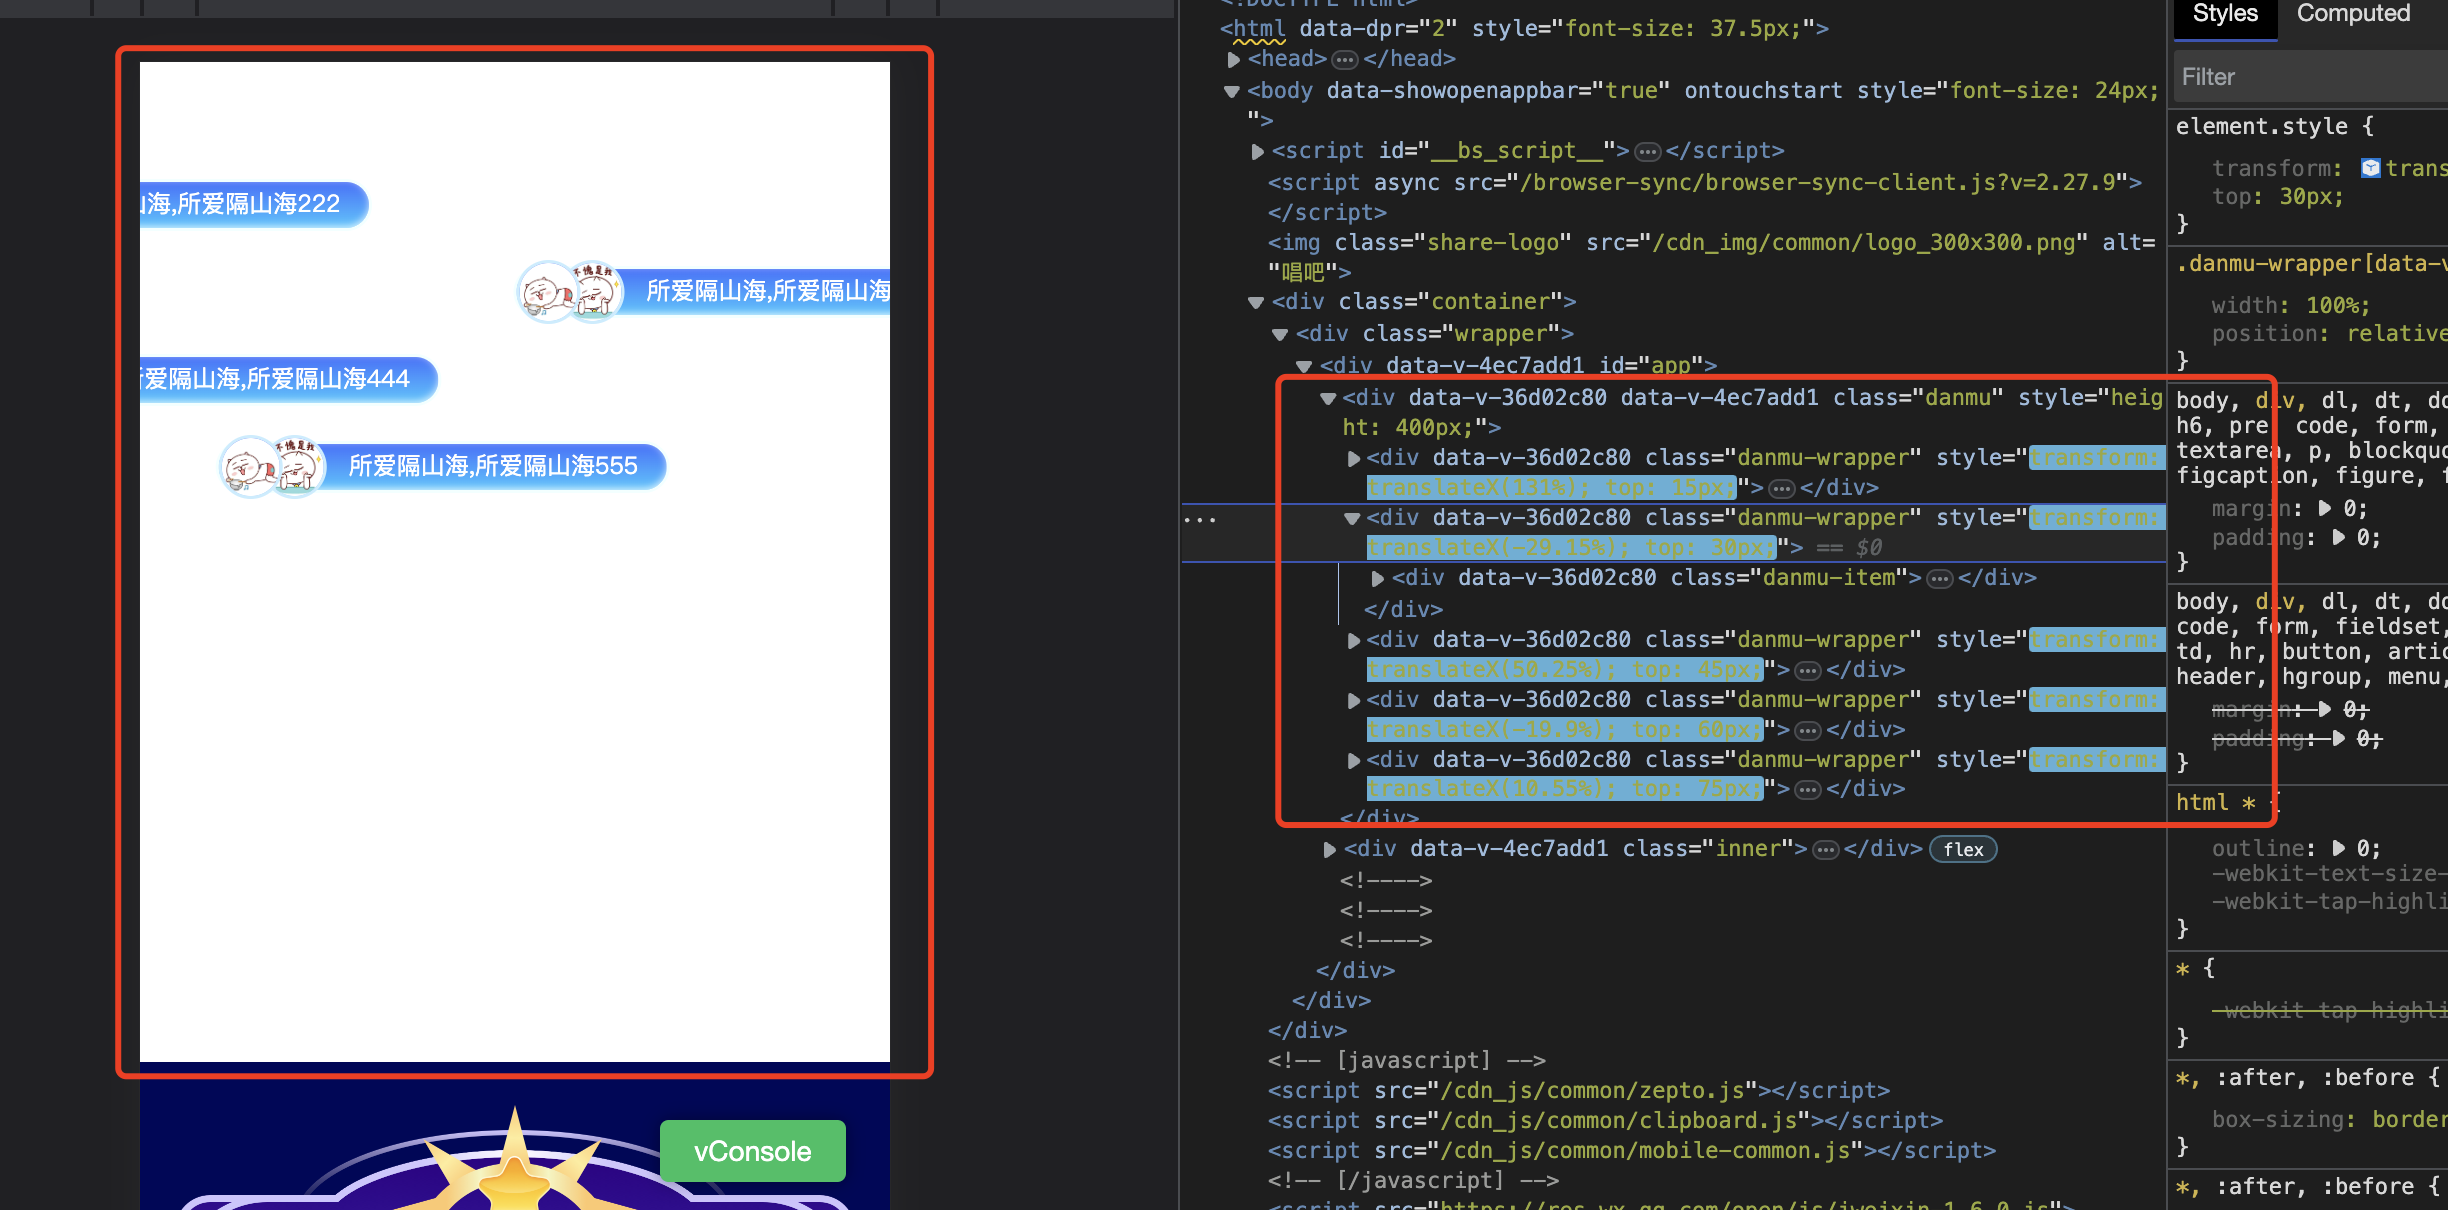
它是一个弹幕组件,系统需要支持有5000条弹幕推送,如果这5000条数据完全交给框架处理的话,将会建立超多的双向绑定(以Vue框架为例),此时肯定性能上是达不到要求的,另外,也不可能一下子把5000条数据一下渲染出来,否则就没法看了。
同时,这些消息还有优先级,比如如果是付费用户的消息,它的优先级要求比普通用户优先展示,直接一下子渲染出来,这个逻辑也不太好写。
根据享元模式的思想启发,实际上我们可以创造一定的弹幕内容节点(搬运工),首先为它准备好它要展示的内容(外部状态),然后事先让两者进行绑定,让它从屏幕的右边滚动到左边,然后它可以再回到右边,解绑。然后重新为它绑定新的弹幕信息展示,重复这个过程,直到把所有的消息都展示完毕。这样就可以使得我们在有限的DOM上展示很多的信息,同时,处理消息的优先级就变成了处理队列或者处理堆了,也将核心业务逻辑解放了出来。
下图是我编写的组件的运行效果:

以下是上述逻辑的vue编码实现。
<template>
  <div class="danmu">
    <!-- 只渲染有限的DOM节点,进行数据的展示 -->
    <div
      class="danmu-wrapper"
      v-for="(ctx, idx) in worker"
      :key="idx"
      :style="{
        transform: `translateX(${worker[idx].offset}%)`,
        top: `${20 * idx}px`,
      }"
    >
      <div class="danmu-item">
        <template v-if="ctx.body">
          <div class="danmu-user">
            <div class="danmu-user__wrapper u1">
              <img
                class="danmu-user__wrapper-img"
                :src="ctx.body.user1.avatar"
                alt="用户头像"
              />
            </div>
            <div class="danmu-user__wrapper u2">
              <img
                class="danmu-user__wrapper-img"
                :src="ctx.body.user2.avatar"
                alt="用户头像"
              />
            </div>
          </div>
          <p class="danmu-body">{{ ctx.body.message }}</p>
        </template>
      </div>
    </div>
  </div>
</template>

<script>
export default {
  name: "Danmu",
  data() {
    return {
      initPosition: [140, 100, 120, 170, 110],
      // 用来从右到左负责搬运弹幕的工人们
      worker: [
        {
          offset: 0,
          body: null,
        },
        {
          offset: 0,
          body: null,
        },
        {
          offset: 0,
          body: null,
        },
        {
          offset: 0,
          body: null,
        },
        {
          offset: 0,
          body: null,
        },
      ],
      // 用来记录消息过多时,还没有播放的弹幕信息
      taskQueue: [],
      // 用来记录消息是否是优先级较高的
      map: new WeakMap(),
    };
  },
  mounted() {
    // 在组件渲染后,开始搬运弹幕信息
    this.start();
  },
  methods: {
    addTask(task, emergency) {
      const available = this.worker.filter((v) => v.body === null);
      // 随机取一个能用的工人
      const worker = available[Math.floor(Math.random() * available.length)];
      // 暂时没有可用的搬运工人,加入等待队列
      if (!worker) {
        console.log("请稍后,暂时没有工人能够干活啦");
        if (emergency) {
          // 找到第一个紧急任务,因为紧急任务也有先来后到的优先级,紧急任务不能直接插入到待处理消息队列的头部
          let idx = 0;
          let existTask = this.taskQueue[idx];
          while (existTask && this.map.get(existTask)) {
            existTask = this.taskQueue[idx];
            idx++;
          }
          // 将当前任务标记为紧急任务
          this.map.set(task, true);
          // 如果当前任务队列里面没有紧急任务,可以直接插入任务
          if (idx === 0) {
            this.taskQueue.unshift(task);
          } else {
            // 否则,插在紧急任务之后,idx是第一个非紧急任务的下标
            this.taskQueue.splice(idx - 1, 0, task);
          }
        } else {
          // 非紧急任务,可以直接放在临时消息队列的尾部
          this.taskQueue.push(task);
        }
      } else {
        // 为当前工人绑定它需要搬运的信息
        worker.body = task;
        // 重新开启动画
        this.startMove(this.worker.findIndex((v) => v === worker));
      }
    },
    start() {
      // 初始化开启搬运弹幕
      let idx = 0;
      this.worker.forEach(() => {
        this.worker[idx].offset = this.initPosition[idx];
        this.startMove(idx);
        idx++;
      });
    },
    startMove(target) {
      // 如果当前搬运工没有任务需要处理,则不需要后续的流程
      if (!this.worker[target].body) {
        return;
      }
      // 如果当前搬运工已经将弹幕搬运到了最左边
      if (this.worker[target].offset <= -100) {
        this.worker[target].offset = this.initPosition[target];
        // 卸载当前搬运的内容
        this.worker[target].body = null;
        // 如果已经没有资源了,结束当前搬运工的任务
        if (this.taskQueue.length <= 0) {
          return;
        }
        // 如果已经处理完成了一个内容,发现消息队列里面还有内容,继续搬运
        if (this.taskQueue.length) {
          const task = this.taskQueue.shift();
          this.worker[target].body = task;
        }
      }
      requestAnimationFrame(() => {
        // 动画处理
        this.worker[target].offset = (
          this.worker[target].offset - 0.45
        ).toFixed(2);
        this.startMove(target);
      });
    },
  },
};
</script>

<style lang="scss" scoped>
.danmu {
  width: 100%;
  height: 500px;

  &-wrapper {
    width: 100%;
    position: relative;
  }

  &-item {
    max-width: 100%;
    height: 52px;
    background-image: linear-gradient(180deg, #3b73ff 0%, #2fc7ff 100%);
    box-shadow: inset 0 -2px 7px 0 rgba(255, 255, 255, 0.71);
    border-radius: 30px;
    border: 4px solid azure;
    font-size: 24px;
    font-family: PingFangSC-Regular, PingFang SC;
    font-weight: 400;
    color: #ffffff;
    display: inline-block;
    text-align: right;
    line-height: 44px;
    padding-right: 28px;
    padding-left: 130px;
    position: relative;
  }

  &-body {
    max-width: 360px;
    white-space: nowrap;
    overflow-x: hidden;
    text-overflow: ellipsis;
  }

  &-user {
    position: absolute;
    left: 0;
    display: flex;
    align-items: center;
    top: 50%;
    transform: translateY(-50%);

    &__wrapper {
      width: 64px;
      height: 64px;
      background: linear-gradient(180deg, #1558fc 0%, #3bb1ff 100%);
      box-shadow: inset 0 -2px 7px 0 rgba(255, 255, 255, 0.71);
      border: 4px solid rgba(198, 237, 255, 1);
      border-radius: 50%;
      position: relative;

      &-img {
        width: 100%;
        height: 100%;
        border-radius: 50%;
      }
    }

    .u1 {
      z-index: 2;
    }

    .u2 {
      transform: translateX(-20px);
      z-index: 1;
    }
  }
}
</style>
在这个实践中,弹幕信息节点的位置信息就是它的内部状态,弹幕信息节点展示的内容就是它的外部状态。
另外,在这个例子中,任务的优先级只有两个判别依据,所以我们可以简单的用一个WeakMap(是用WeakMap的优势是不用关系消息对象什么时候销毁)来标记,假设您的业务需求可能有好几种优先级判别依据,那么你就只能用堆来解决这个问题了(比如医院急诊科医生处理任务,一个病人已经休克,一个病人的伤口血流不止,一个病人发着高烧,另外一个病人只是感冒了,那么医生肯定会病情的轻重缓急决定先救治哪个病人)。